Where has this been my whole life?! #travelproblems #mualife
The 10 Best Travel-Sized Products at Sephora
Reply

Where has this been my whole life?! #travelproblems #mualife

Hey Guys!
Today we are going to talk a bit about brows and how I personally like to fill them in. There are SO many products, techniques and tools to use when it comes to brows, so I’m just going to talk about what I find works best for me! Let’s get started…
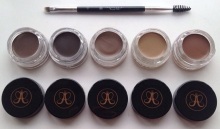
Dip Brow by Anastasia Beverly Hills: I use this product in Blonde.
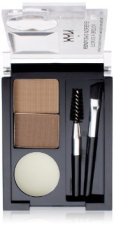
NYX Eye Brow Cake: This product comes with clear brow wax and 2 powders (one that’s a darker shade and one that’s lighter); I tend to mix the brow wax with my Dip Brow to achieve MY desired results. Don’t be afraid to mix your products! I mix pretty much every step of my makeup to really customize the look!
A Concealer: Whatever you favorite concealer is, use it here. I tend to grab a brightening concealer that will highlight the brow nicely.
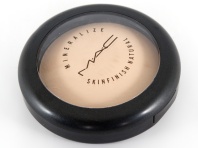
A Setting Powder: I use MAC Mineralize Skin Finish, but feel free to use whatever powder you have handy. Usesomething a bit lighter than your skin or something translucent.

If you have any comments or questions please leave them below!
 Hopefully if are regularly using makeup brushes for your foundation, blush and eye shadow you are also equally cleaning them!? Washing your makeup brushes should almost be as regular as showering (let’s hope you do that more than once a week). Bacteria, oil, dirt and makeup all get trapped in the bristles of your brushes, and if they aren’t cleaned regularly this will lead to clogged pores and annoying breakouts.
Conventional brush cleaners often contain a ton of alcohol, which can be hard on your brushes and your skin. Luckily for you, you can clean your brushes like a pro at home even if you are on a budget! Do this deep cleaning once a week and do it after you’ve applied your makeup because the brushes will need a couple of hours to dry.
You will need:
• A bowl
• Any gentle Paraben free shampoo (ie. baby shampoo) or Dawn hand soap works well too
• A cloth
• A sink
Instructions:
Is it time to clean your brushes? Do you have a DIY brush cleaner recipe to share?
Leave a comment below!
A DIY Cucumber & Clay Mask That Will Remedy Your Breakouts

If you’re “blessed” with acne-prone but sensitive skin, this mask should be right up your alley. Clay is incredibly useful for fighting acne and overly oily skin because it soaks up excess sebum without overdrying your skin. A dash of honey provides natural antibacterial properties, and adding a little bit of cucumber will create a calming, soothing effect. We recommend using this mask once a week after cleansing and exfoliating. Here’s what you’ll need:
Ingredients:
1/2 cup green clay
1 cucumber
1 teaspoon honey
A fruit/vegetable juicer (optional)
Steps:
Cut the cucumber in half, width-wise. Cut two thin slices (you’ll use these later). Then, juice the cucumber with your juicer. If you don’t have a juicer, just pour some cool tap water into a bowl, then slice the remaining cucumber and let them sit in the water for about 15 minutes.
In a bowl, use a fork to mix the cucumber juice and honey with the clay until you have a thick paste. You can add more juice or water to get the consistency the way you like it.
Apply the paste to your face and place the remaining two cucumber slices over your eyes. Then go rest and relax! When you remove the mask after 10 minutes or so, you’ll see clearer, smoother, calmer skin.


The holidays can be a very busy time for makeup artists! While others are getting ready for their vacations, you might be getting ready for themed parties and corporate events. Don’t let an upswing in business so close to the holidays stress you out! Particularly if you’re a freelance artist or are in charge of your own schedule, there will be time for relaxation when everyone settles down for some family time. During that time, why not look back and think about all of your accomplishments as well as the times that could have gone better? Use this holiday break to evaluate your work ethic as this is a great time to break old habits as we welcome in the New Year!
Here are some of our effective New Year’s resolutions for makeup artists- TAKE A LOOK & ENJOY!

If you’re going to make a fresh start for the New Year, why not start with your makeup kit? Most professional makeup artists can be guilty of holding onto products for too long or carrying around too many things. First things first, evaluate all of your products expiry dates and throw out anything that is too old. Also clear out things that are broken, empty, and or clean tools and compacts that have that dreaded messy look!
As a professional, you clean your brushes regularly but do you also clean and sanitize the case that holds all of your makeup? Check ALL cases, kits and bags for any excess powder, clutter, dustiness, or anything else that might look messy to a client. If you have more than one kit (for example: small travel kit for basics, a kit for special effects makeup, and a larger kit of more detailed jobs), make sure you clean and organize each one.
Going into the New Year with a fresh, CLEAN, organized kit will help you feel prepared to tackle new bookings after some time off.

When you’re networking and dealing with potential new clients, it can be easy to let your phone contacts get out of hand and your email inbox’s get cluttered. Instead of letting that tied down feeling follow you into the New Year, take some time to sift through your contacts and emails to reduce the clutter and build up. If you’re receiving junk mail from a company whose services you aren’t using, unsubscribe from their thread. If you have numbers in your phone that you don’t use or recognize, clear them from your contact book (just make sure you really don’t need them first!).
Consider creating tags in your email such as “keep from 2014” or “2014 clients” to file away old correspondence that you might want to refer to later. This way you still have easy access to those emails, but they’re not taking up space in your main inbox and distracting you from NEW client emails! Clean out your texts, voicemails, Facebook messages, and even your physical mailboxes. The more open and organized you are the less overwhelmed you’ll start the year out feeling.

Do you have pictures of projects that you haven’t had a chance to post online amidst your holiday rush? Is your profile picture six months old, or your page’s description the same as it was when you first created your professional account?
These are the perfect questions to ask yourself when revamping your online presence and this is a perfect time to give your social media presence a kick in the right direction! Soon you will notice that this much needed change as it will reduce distractions and make your profiles better business tools for you and your clients. Make it your 2015 goal to regularly maintain your accounts and you’ll feel like social networking less of a tedious process!

You will probably want to use some of your time to actually breathe and take a break, but playing with new makeup techniques on your free time can be fun too! After a busy spree of beating other people’s faces, why not learn something new in the comforts of your own home? By practicing new techniques or products on yourself or friends and family will be very beneficial to you and your new upcoming clients as well.
Of course it is always important to squeeze in family, fun and relaxation time during the holiday season, but try to use some of your spare time in the coming year learning new tricks and keeping your skills up to date with recent trends. This might save you from feeling like you’re stuck doing the same daytime look or evening smoky eye all the time as you will be prepared for a challenge if a client requests something unique!

Adopting a positive outlook on the coming year right from the outset is technically something that everyone should do, but it can be a particularly useful resolution for makeup artists! You work in an industry where passion and personal style fuel your skill, so staying positive and excited about your work is crucial. Don’t look at the year ahead as a looming hurdle, or you might start to feel intimidated and overwhelmed. Instead, look at the exciting things you’ve got planned in the near future, and all of the time you have for new experiences throughout the year. As cliché as it sounds, a new year is a great time for a fresh start, so try to shed lingering holiday stress and face the New Year with a cheerful mindset!
All of us here at Ruby Makeup Academy are all wishing you a happy and SAFE New Years! Please don’t forget to to leave any comments or blog requests below.

Believe me, I understand – choosing a makeup brush is indeed a bit tricky. There are so many questions – what type of brush do I need, why is this one shaped like this, what is the best hair for the brush…. All these factors add up to paying anywhere from $5 to $50 for a makeup brush. What’s the difference?
There are several key components to make you aware of when looking at makeup brushes. The shape of the brush, the brush hair or material, and even how the brush is made is also a factor. If you end up buying a cheap brush, don’t be surprised when it falls apart in a few months. Just the same, it doesn’t mean the most expensive brush is the best brush. Some major labels or designers are charging high prices for the same type of brush you can buy else where online.
So what should I look for? Here’s a guide to help you examine the top three most important factors when choosing a makeup brush: type, shape, and hair.
Brush Type:
There are many, many types of brushes, and in general, a makeup brush is made for one section of the face. You have your foundation brushes, your powder brushes, then you have eyeshadows, lips, brows….oh my goodness – there are so many! Here’s a list of the top types of brushes and their general uses (please note – you can get creative and use these brushes outside of the scope of their original intent. For simplicity, I am only going to focus on the general uses).
Other Brushes:
Here are some other brushes you may run across. I see these as nice-to-have’s but not really a staple in your everyday makeup kit
Brush Shape
Brush Hair–
Another important factor in brush selection is the brush hair. Here are the three main types of hair or material you want to look at for your makeup brushes.
There are so many other types of hair – squirrel, pony, goat – all are great for their respective makeup types, but will not last as long or be as soft as sable or Badger.
Thanks for following! If you have any comments or questions please leave a comment or blog request below!
Sincerely & Happy Holidays!
Ruby
Why, Who and How to Choose the Right Foundation Formula for Your Skin Type

Powder Foundation: Why It’s Great
With powder formulas, you can achieve anything from a subtle to over-the-top drama, it also tends to have the most staying power while still maintaining its intensity of color.
Powder Foundation: Who Can Wear It
I recommend loose mineral foundation for all skin types. Also, because a loose mineral foundation tends to have fewer ingredients, it makes them great for sensitive or allergy-prone skin. If you tend to have more oily skin, try a pressed powder.
Powder Foundation: How To Apply It
If you are applying a loose powder use a natural hair brush, the softer and fuller the better. If you’re oily or applying a pressed powder I always suggest using a natural hair brush or a sponge for ample coverage.

Liquid Foundation: Why It’s Great
Cream or liquid foundations give a somewhat more made-up look to the skin, though they still look natural when applied properly. I tend to use them for evening makeup, when I want the face to have a more finished or polished look.
Liquid Foundation: Who Can Wear It
Anyone can use a liquid foundation but if you have oily skin, look for water-based formulas so it won’t clog your pores.
Liquid Foundation: How To Apply It
Liquid foundations can be applied with your fingertips, sponges, or—my personal favorite—a CLEAN foundation brush, usually they are made with synthetic fibers!

Mousse Foundation: Why It’s Great
Mousse foundations are primarily water, so they give a light, more natural finish to the skin and they dry quickly.
Mousse Foundation: Who Can Wear It
They are for all skin types, but I usually suggest mousse foundations for someone with oily skin because the formulas are lightweight.
Mousse Foundation: How To Apply It
Dot on and apply outward from the center of your face to your hairline for more of a blended look. Use your fingertips or a damp sponge and then come back over with a foundation brush for perfect coverage. Apply sparingly—a little goes a long way with these ones!
Stay tuned for our guide to makeup brushes and Ruby’s how to freebie on how to find brushes at a discounted price!

Now that you’ve officially traded your bronzers and shimmery lip-glosses for cheek stains dark lip, it’s time to turn your attention to transitioning your skin routine as well! For me once the weather gets chillier, my skin will begin to feel dry, flaky and even sometimes chapped. Since I usually feel this way as the season’s change I wanted to share my most treasured secrets with you in hopes that they are helpful!
1.) Hot or Not: A hot, steamy shower may feel great, but it’s actually making your dry skin worse. Your hot showers are stripping your body of its natural oil barrier, and you need that barrier to help retain moisture and keep your skin smooth and moist. My best tip for this is to immediately slather on my favorite lotion to lock in moisture post shower!
2.) Sunscreen Saver: A lot of people ditch the sunscreen once fall rolls around – BIG MISTAKE! Just because you can’t see the sun’s rays doesn’t mean it isn’t affecting your skin. For those of you who live in snowier areas, the snow’s glare can be especially damaging to your skin. Make sure to apply a broad-spectrum sunscreen to your face before stepping outside, no matter how gloomy it looks.
3.) Switch It Up: When it comes to your skin routine, fall is the best time to switch to milder cleansers and richer moisturizers. Since the cold weather dries out your skin, help it out by using a creamier lotion or moisturizer. In my opinion do the same with my makeup products – for example, swap your powder blush for a cream blush to give your skin that dewy glow and it will cover up any dryness that you may have.
4.) Exfoliate Less: When it came to my dry or flaky skin I used to immediately reach for my trusty face brush or exfoliating body wash. After all, if we can buff away any flakes on our lips, the same should apply to our face and body, right? WRONG!!! Thirsty skin peels, and exfoliating it can lead to more skin irritation and dryness. Quench your skins thirst by moisturizing and ONLY exfoliate or dry brush afterwards if necessary.
5.) Prime Time: One of my go to products for my face to create that soft and smooth canvas would be to use a primer. As we all know most foundations are usually pretty drying to the skin, although if you apply a primer as your base it will prevent your product from settling into any lines on your skin and will give you that long lasting look morning to night! During the colder months, I also recommend warming up your foundation with your fingers for a smooth, even finish to complete your look.
I hope my tips work for you and if you have any comments, questions or topic requests please find me on Facebook as well Instagram (@rubymakeupacademy)!
Stay tuned!
Ruby

Now that summer is coming to an end I wanted to share my secret tips and tricks to keep your chapped lips at bay!
I always suggest doing a lip scrub for all of your desired lip looks because there is nothing worse than a bold lip with dry, chapped or flakey lips! No matter if you’re on a budget or you just don’t want to spend $50 on a lip scrub you can use my simple DIY ingredients below to get the results you’re looking for- ENJOY & scrub away!
Ingredients & Directions
2 tsp of sugar
½ tsp of honey
¼ tsp of extra virgin olive oil
½ tsp of vitamin E oil
Petroleum jelly or coconut oil (I use petroleum jelly- it’s not as “runny”)
I hope you all enjoy my recipe and that it is helpful this coming fall! If you have any questions or suggestions please find me on Facebook or Instagram (@rubymakeupacademy)!
-Ruby

Happy Thursday, amazing Ruby girls and guys! We put together a few tips for all of you starting out, on how to grow your client list!
Do you have any tips for networking? We would love to hear them!
